Kitchens have been called the hub of the home, and while that may mean different things to different people, what is surely the case is that kitchens are the most expensive room in the house to remodel. According the HomeInsight, the average kitchen remodel is $20,000.
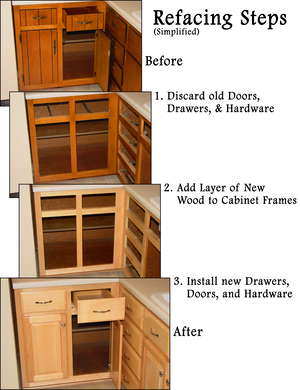
Looking to knock that number down when you remodel your kitchen? Refacing cabinets is a great way to create a new look, quickly - with minimal disruption to your kitchen - and usually at a significant cost savings versus replacing cabinets in their entirety. Refacing kitchen cabinets entails reusing your existing cabinet boxes and frames while replacing the cabinet doors and drawer fronts.
Refacing kitchen cabinets requires great deal of skill and patience - it is a do-it-yourself project that should be only undertaken with that in mind.
Step 1 - Make an Assessment
Not only does refacing kitchen cabinets require reusing your existing cabinet boxes, it means that you cannot change the layout or design of your existing kitchen cabinets. You must be happy with the cabinets size and flow. Satisfied with the layout? The next most important consideration is the condition of the existing cabinet boxes. If the cabinet boxes are in good condition, the next step is to consider the new look that you are trying to achieve.
There are a host of different sizes, styles, and finishes for pre-made doors and drawer fronts available, which should make it easy to find a standard size that fits your needs. You can, of course, always have custom doors and fronts made, but that will cut substantially into your savings.
Step 2 - Pick the New Finish
Do you want a new, traditional, natural wood finish, a paint finish, or perhaps a contemporary high-tech finish? There are both prefinished and unfinished products available. There is an obvious benefit of using prefinished material, but I cannot stress enough the care that must be used in working with prefinished productsthey are nearly impossible to touch up, especially if you ding them. If, on the other hand, you wish to custom color or just enjoy the process and personal touch finishing, then unfinished is the way to go. Again, you have the additional security of being able touch up any accidents that may occur during installation.
Step 3 - Prep the Space
Remove all the doors and hardware and clean the exposed surfaces of the cabinet boxes. After cleaning the surfaces, they should be roughed up a bit with some sand paper. That will help the new face, which will be glued and nailed, adhere better to the box.
Step 4 - Install the New Face
The existing boxes get their new base layer first. Cut the new face to size and apply carpenters glue to the underside. Glue and nail in place. The new face, if you are looking for wood cabinets, is typically made from plywood with a finished face made from a thin veneer of the finished wood (oak, maple, walnut, cherry, etc.), or if you are a painting, it can be made of a laminate, and resin based, if you are looking for a glossy high-tech finish.
Step 5 - Veneer the Boxes
The vertical member of a cabinet face is called a stile and the horizontal member is called a rail. Add your chosen veneer by gluing it on the stiles, and then the rails of the existing cabinet boxes. Veneers can be very thin and should be applied carefully - cut them to size using a sharp scissors, and then remove the self sticking back as you go along. Be careful to force out air bubbles when you apply the veneer. Set the veneer on the stile and extend it inside the box. It needs to be carefully trimmed, using a clean sharp utility knife. Most professionals overlap the rail slightly with the veneer. This means that the veneer for the rail is put on after applying the veneer to the stile, and is butted-up inside the vertical piece, which also requires careful trimming.
Step 6 - Hang the New Doors
Hanging doors can be challenging because the doors need to be carefully aligned and square. This task can be aided with the help of a template usually supplied with new hinges. I suggest purchasing adjustable hinges, which allow for simple adjustments with just the aid of a screwdriver. First, attach the hinges to the doors and then to the frame, making small adjustments until the doors are in the correct position, and then tighten in place.
Step 7 - Install the New Drawer Fronts
Replacing the drawer fronts can be relatively easy if the old ones are screwed onit is a matter of unscrewing the old one and screwing on the new one. If, however, the old drawer front is one of the four sides of the existing box, you can trim all sides of it so it is now flush with the box. Turn the drawer around so that the old drawer front face will now become the back end of the drawer. The new drawer front is attached to the old back, taking care to attach it from the inside. It is now the new front end of the drawer. Since drawer slide hardware is directional, you will have to turn the slide hardware around and re-install it.
Step 8 - Add New Hardware
Finally, complete your new cabinets with matching hardware - drawer handles and pulls. You need to properly align and drill holes, which is usually facilitated by a template that accompanies the new hardware. If not, you can make a jig (template) out of a piece of scrap wood. This allows for accurate and consistent placement of the hardware.
The Moral of the Story
The moral of the story is, and I cannot stress this enough, the need for accurate measurements, especially if you are using a prefinished product. If you are purchasing the doors and drawer fronts locally, take the existing ones with you to minimize any chance of error. Given care and patience, a level of comfort with your DIY skills, and a long weekend, you can have the pleasure and look of new kitchen cabinets. Even if you choose to have a professional reface your cabinets, the savings can be significant over the cost of removing and replacing everything.
Step-by-step image supplied by Richmond Refacing
 LOOKING FOR MORE INEXPENSIVE KITCHEN UPGRADES? HERE ARE SOME EASY, AFFORDABLE WAYS TO SPRUCE UP YOUR KITCHEN.
Do-It-Yourself - Cabinet Refacing | Home Depot
Update your kitchen with Do It Yourself cabinet refacing and remodeling through The Home Depot.
How to Reface Kitchen Cabinets | DoItYourself.com
Kitchens have been called the hub of the home, and while that may mean different things to different people, what is surely the case is that kitchens are the most
How To Reface Your Kitchen Cabinets
These kitchen cabinet refacing instructions from Cabinet Doors Depot show you how you can reface your existing cabinets yourself and save thousands of
DIY Kitchen Cabinet Refacing | Do It Yourself Cabinet Refacing
DIY Kitchen Cabinet Refacing gives do it yourself-ers beautiful remodel kitchen cabinets cheaper than all-new. Choose reface collections in all colors and styles.
Refacing Kitchen Cabinets - Cabinet Doors - DIY Cabinet ...
Refacing Kitchen Cabinets. Homeowners have trusted us for do-it-yourself kitchen cabinet refacing for over 30 years. We will show you how to beautify your kitchen
How to Reface Kitchen Cabinets on Your Own | DoItYourself.com
When it comes to remodeling your kitchen, one of the best things to do is to reface kitchen cabinets that are already there instead of replacing the cabinets all
How To Reface Cabinets - Cabinet Refacing, Kitchen ...
How To Reface Cabinets Cabinet Refacing and Refinishing | DoItYourself.com. Refacing kitchen cabinets can be a less expensive alternative to a complete kitchen remodel.
How to Reface and Refinish Kitchen Cabinets : How-To : DIY ...
DIY expert Paul Ryan shows how to reface kitchen cabinets to a kitchen makeover on a budget by refacing old kitchen cabinets with new wood veneer. Do it yourself
Do it Yourself Cabinet Refacing - DIY Cabinet Refacing
Resources for do it yourself cabinet refacing are few and far between. Kitchen Cabinets; Cabinet Refacing; Can You Reface Your Own Cabinets?
Do It Yourself Cabinet Refacing | eHow - eHow | How to ...
If you have a set of old, dingy kitchen cabinets, and the wood's not good enough to consider stripping and refinishing, consider refacing. That is an
Travelling is my life
ConversionConversion EmoticonEmoticon