| Standard Base Cabinet
First, you should find a quiet, open space where you can spread out your parts. I like to work from a bench or raised surface but any open floor space works well. Place your box face down and open by carefully cutting packing tape, remove all parts and locate face frame and side panels.
You will want to place the face frame (face down) on any scratch resistant surface. The box you just opened will work nicely. Also, locate and open the parts bag. This bag has plastic parts and extra screws. |
 |
 |
If you needed to reverse the hinge (door swing direction), (single door base cabinet) It is much easier to do it now, before attaching side panels. Simply remove the screws holding the hinge to the face frame, flip door, and reattach to other side of face frame. (some cabinet lines use hinge plugs in the door frame)
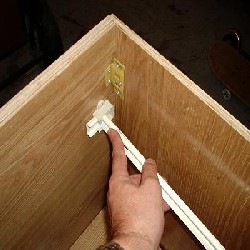
Position side panel over edge of face frame, align "L" brackets to slide under locking plates. Be sure the side panel fits into grove along face frame edge as illustrated.
|
 (metal bracket) insert locking screw |
 |
| Because we supply products from several different distributors/manufacturers, you may find other assembly points (cam- locks) than what is illustrated here. All assembly points are pre set at the manufacturing facility and should not need to be moved or or realigned. |
 |
|

|
Before tightening the screws of the locking plate, be sure the ends of face and side panels are flush (even).Insert and tighten locking screw. Continue tightening brackets and inserting locking screws so both side panels are attached to face frame. You may want to attach kick plate now.
|
| Slide floor panel into groves in side panels. Make sure floor panel is seated in grove of face frame as well. Finished side of floor goes to inside of cabinet. |
 |
 |
Align back panel "L" brackets to fit in side panel locking plates. |
| Make sure back panel is seated in side panel edges before tightening brackets. |
 |
 |
Install drawer glides as shown...note left and right....wheel end goes to front of cabinet...wheel is below screw hole.Depending on your drawer guide system, your hardware may or may not look like the pieces shown |
 |
 |
| assemble drawer box
Screw together the back wall and the two side walls, then slide the bottom panel into the pre cut groves before attaching the front plate (drawer head). Again depending on your cabinet line....you may want to use some wood glue on the dovetail joints (if applicable) |
 |
 |
 |
| Insert shelf clips and set in shelf. Note the finished edge of shelf faces forward, towards door.
Insert Rubber Bumpers to inside of drawer front and door(s). May need to "wet" them.
Install plastic corner brackets as needed. These are used to screw your countertop down to the cabinet.
|
 |
 |
 |
 |
Wall cabinets are assembled in a similar fashion but should go much faster (no drawers, toe kick,etc). I have found it much easier to assemble the sides, top and bottom plate first, then attach the face frame, and lastly, screw on the back plate from the outside. To determine left or right hinging for single door "square" wall cabs, you will simply turn the face frame prior to assembly...The bottom plate (floor) is finished on both sides. Arched doors may have the pre drilled hinge plugs rather than requiring a full hinge/frame flip. |
| Once you have a couple of boxes under your belt, you should see that each box takes about 10 to 15 minutes to complete.
***Assembly Pictures Shown: using Carolina Oak, Charleston Birch, Spice Maple and Tuscany Cherry |
If you run into any assembly problems please call me any time
386 761-4946 Vickie Davis. |
2 comments
Click here for commentsnice post
Replynice post
ReplyRta cabinet store
ConversionConversion EmoticonEmoticon