DIRECTIONS FOR ASSEMBLING OUR RTA BASE CABINETS (EXCEPT BAMBOO LINE)
STEP 1: CLEAR A WORK SPACE
Place your RTA cabinet panels on a smooth, scratch resistant surface in a large, open area. (Some people like to work on a carpeted area; others prefer to elevate the cabinet by placing it on a table top. If you are not using a carpeted area, placing a large beach towel or blanket under all wood surfaces is helpful to protect the wood from being scratched).
____________________________________
STEP 2: ORGANIZE YOUR MATERIALS
We suggest starting with a 12 inch, 15 inch, or 18 inch base cabinet, taking care not to scratch the wooden panels against each other. Carefully remove all contents from one shipping box. Next, organize your screws by size and type. Keep flat headed screws separate from those with a slightly rounded head.
Short flat headed screws attach mounting glides on drawers to the cabinet;
The longest screws hold the drawer together;
The small round headed screws are used in all other areas.

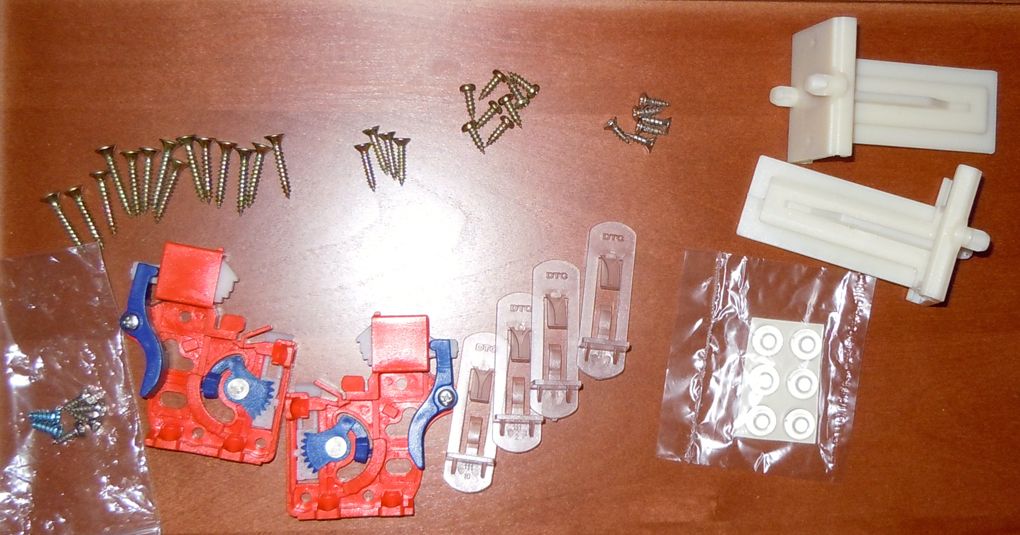

Our SEMI-CUSTOM and DELUXE RTA Cabinets come with Heavy Duty Undermount Drawer Glides and screws, Orange clips for soft-close glide supports, shelf clips, bumpers, nylon brackets, and I-beam slats;
Our less expensive RTA Basic Builder and Better Builder Grade cabinets such as Country Oak, BBG Tan, BBG Spice, BBG Expresso, and BBG Cheery come with Epoxy Coated Drawer Glides. ____________________________________________________________________________________________________________________
STEP 3: START WITH THE DOOR FRAME
Place the cabinet door frame face down on your smooth surface such as a towel or rug. (Do NOT use cardboard or a hard surface, as that may scratch your wood).

_________________________________________
STEP 4: (OPTIONAL) REVERSE THE HINGE
If you need to reverse the hinge on a single door base cabinet so the door swings in the other direction, this is the ideal time to do that. All you have to do is remove the screws that hold the hinge to the door face frame, flip the door over, and reattach the hinges to the other side.


_________________________________________
STEP 5: ADD SIDE PANEL TO DOORFRAME
Lift one side panel and attach it to the doorframe by sliding its locking plates over the L brackets on one side of the door face frame. (Be sure the groove on the bottom of the panel meets the groove of the bottom of the door face frame). Align the brackets, making sure the ends of the door face and the side panels are even, without one protruding past the other.

Attach one cabinet side to the back of the door frame by sliding one locking plate over its corresponding L-bracket. Align holes. (When holes are aligned, you usually can hear a slight clicking sound as they lock into place). Add a small round-topped screw to the center hole of the locking plate, but dont over-tighten it. Tighten side screws. (The benefit of this design over one with camlocks is that once an L bracket is screwed into the locking plate and tightened, it is unlikely to come apart as some camlocks do).


L bracket Locking Plate Slide locking plate over "L" bracket. Add middle screw, then tighten side screws. ____________________________________________________________________________________________________________________
STEP 6: ADD 2nd SIDE PANEL
Slide the locking plates on the other side panel into the L brackets on the opposite side of the doorframe, and repeat the process above. Again, be careful not to over-tighten the center screw. Tighten the additional side screws.

_____________________________________________
STEP 7: ADD THE CABINET FLOOR
With the door face frame still face-down on the floor and the sides now attached, slide the floor panel into the grooves between the side panels. (Be sure the finished side of the floor is on the INSIDE of the cabinet, and be sure the corner cutouts face up, leaving a slight opening in the groove here).

____________________________________________________________________________________
STEP 8: ADD I-BEAM SLATS

Just prior to adding the cabinet back panel, turn your cabinet upright wit the drawer facing you. Just above the drawer, slide one I-beam support slat (DRILLED HOLE SIDE DOWN) into the groove on each side of your cabinet.
____________________________________________________________________________________
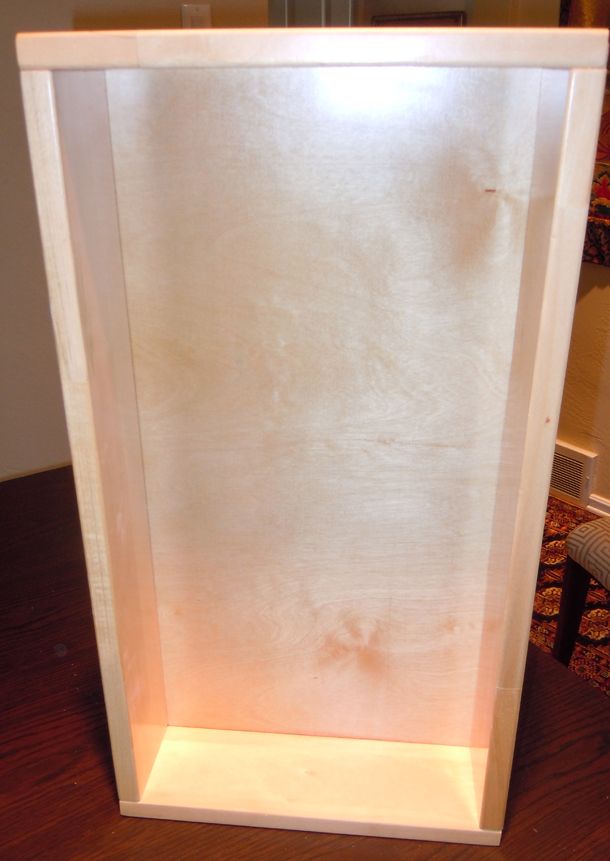
STEP 9: ADD THE BACK PANEL
Attach the back panel next. To do this, place the L brackets of the back panel into the locking plates on the two side panels. Next, carefully flip the cabinet over so you can access the inside. Add the center screws to the L brackets and tighten, but dont over-tighten. Next, tighten each L-brackets side screws.
____________________________________________________________________________________
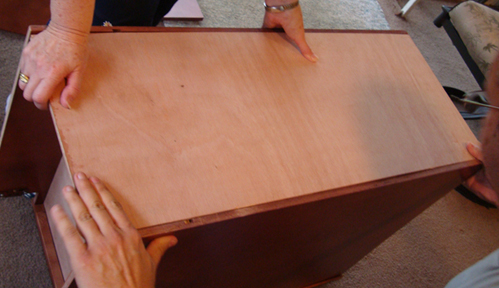
STEP 10: ADD THE KICKPLATE
Add the kick plate to the bottom of the cabinet, making sure the finished side faces out and the unfinished side in on the inside. Insert the locking screws and tighten them. Turn the cabinet upright.

__________________________________
STEP 11: ADD SHELF CLIPS
Insert two plastic shelf support clips into the holes on one side of the cabinet at the height you desire, making sure they are aligned. Insert the other two support clips on the opposite side of the cabinet, making sure you use the holes that align with those of the shelf clips on the first side. We encourage you put the shelf aside for now, and install all cabinet shelves ONLY after your cabinets are installed in your kitchen.

_________________________________________________________________________________________
STEPS 12 - 19 ARE FOR BBG, SEMI-CUSTOM and DELUXE LINES THAT COME WITH DOVETAIL DRAWER BOXES
(NOTE: The Country Oak RTA model and Santa Fe RTA model come with side mount glides. Skip to STEP 19 for those). All of our other RTA models come with UNDERMOUNT glides.
STEP 12: ASSEMBLE THE DOVETAIL DRAWER BOX ON BBG, SEMI-CUSTOM, and DELUXE CABINETS
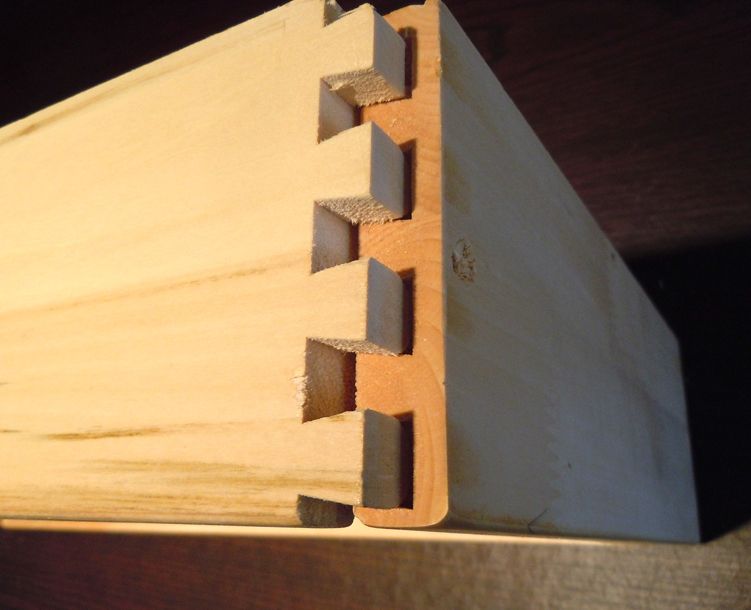
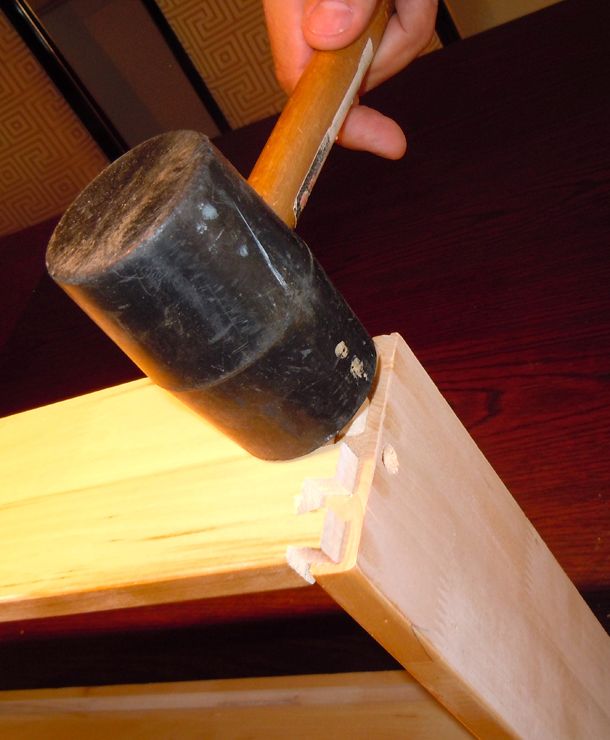
Line up the four sides of your dovetail drawers so the grooved line is closest to the bottom center of each side. Tap one long dovetailed side and one short dovetail side together, making sure the grooved line for each is on the INSIDE BOTTOM, and that the dovetails align. Use a rubber mallet to gently tap the dovetails into place. Add the second long dovetailed side to short side that already has the long side, and tap into place.
----------------------------------------------
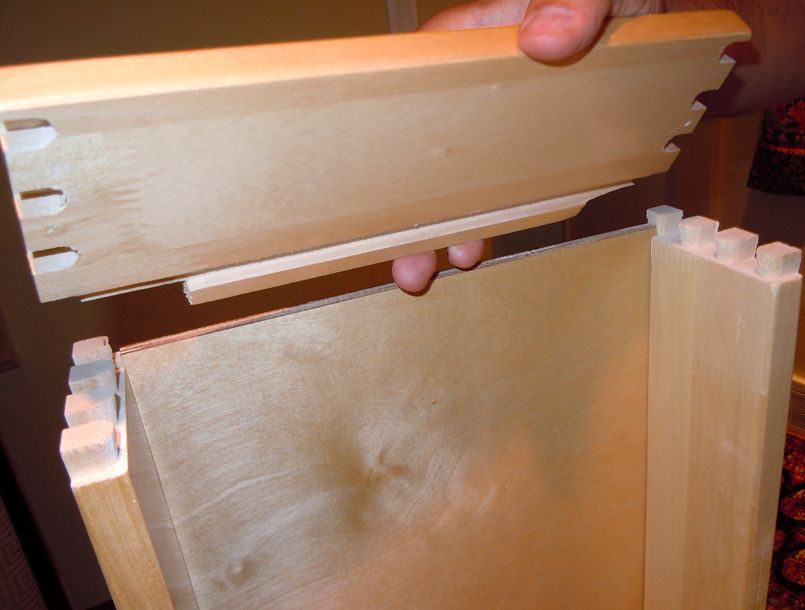
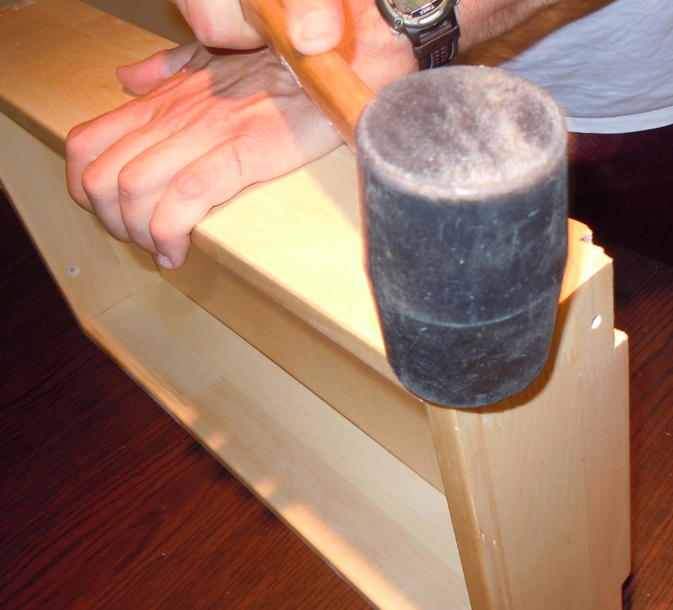

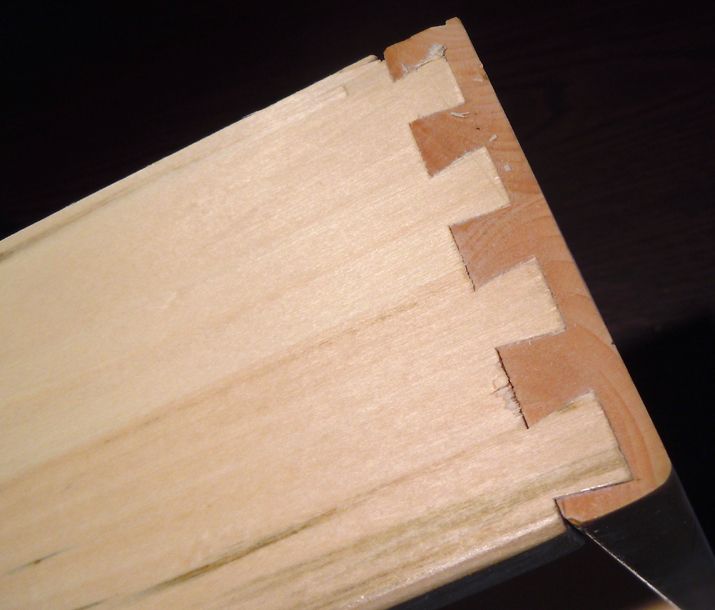
Slide the DRAWER bottom into place between the two long dovetail sides (being sure the SMOOTH, FINISHED SIDE FACE IN). Next, fit the second short dovetailed piece into place, with the grooved portion over the edge of the drawer bottom, and tap into place on both sides. Use your LONGEST screws to secure the dovetail drawer box SIDES in place in the pre-drilled holes.
_________________________________________________________________________________________________________
STEP 13: ADD THE DRAWER HEAD TO THE FRONT OF THE DRAWER BOX

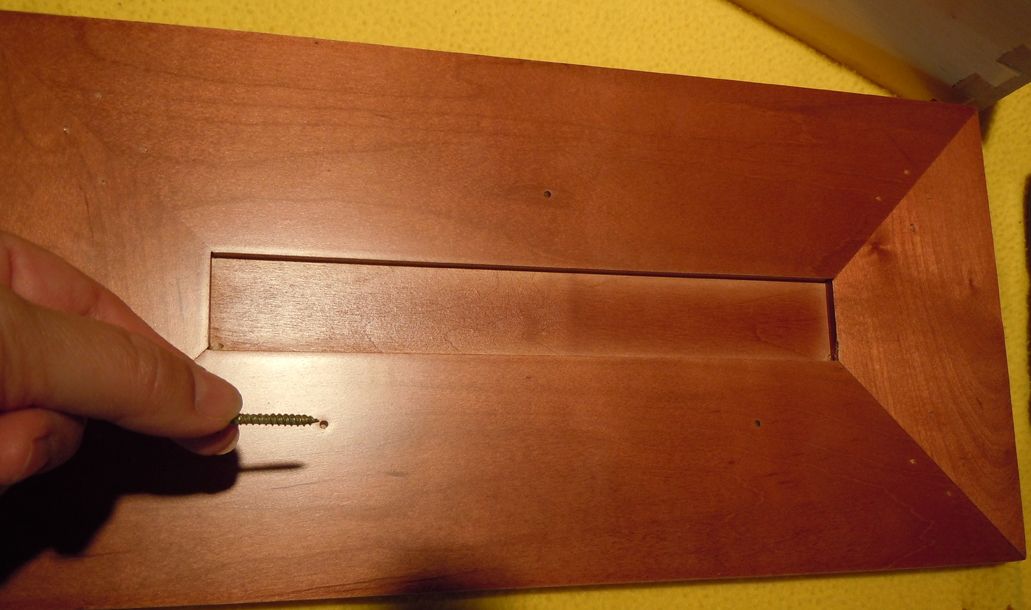
Use two MEDIUM length screws to connect the FRONT of your dovetail drawer box to the BACK of the drawerhead Be sure to measure the screw does NOT go through the front of the drawerhead.
_________________________________________________________________________________________________________
STEP 14: ADD ORANGE GLIDE SUPPORTS TO DRAWER BOTTOM ON SEMI-CUSTOM and DELUXE CABINETS
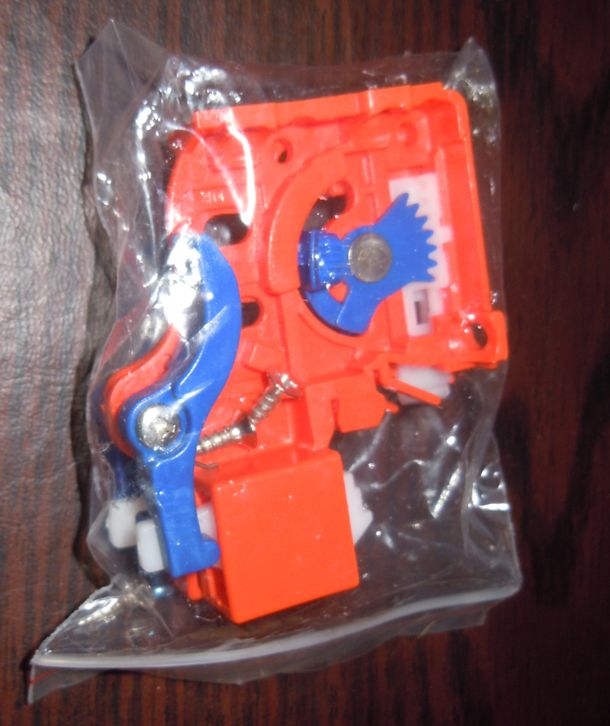
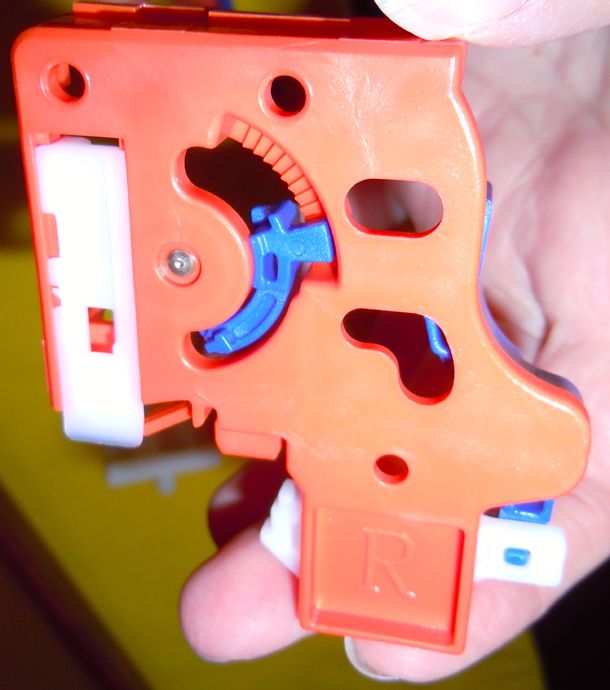
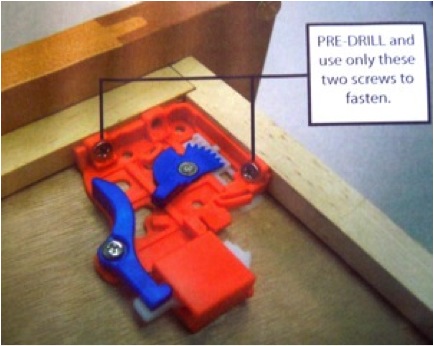
Each orange and blue glide support comes with its own screws. These mechanisms help secure your drawer glides to a dovetailed drawer box, and allow you to remove the drawer box should you need to at a later date. On one side, they are marked eiher LEFT or RIGHT. Turn your assembled dovetail drawer box upside down so you can add the supports to the BACK of the drawer box. Place the LEFT orange and blue drawer mechanism in the LEFT front corner of the back of the drawer box near the drawer head. Place the RIGHT mechanism one in the RIGHT front corner of drawer box, near the drawer head. Add only TWO flat head screws to each organge mechanism in the pre-drilled holes shown on the sides.
DRAWER REMOVAL
If you ever need to remove a drawer box for any reason, pull the BLUE quarter moon levers to release them from the drawer glides.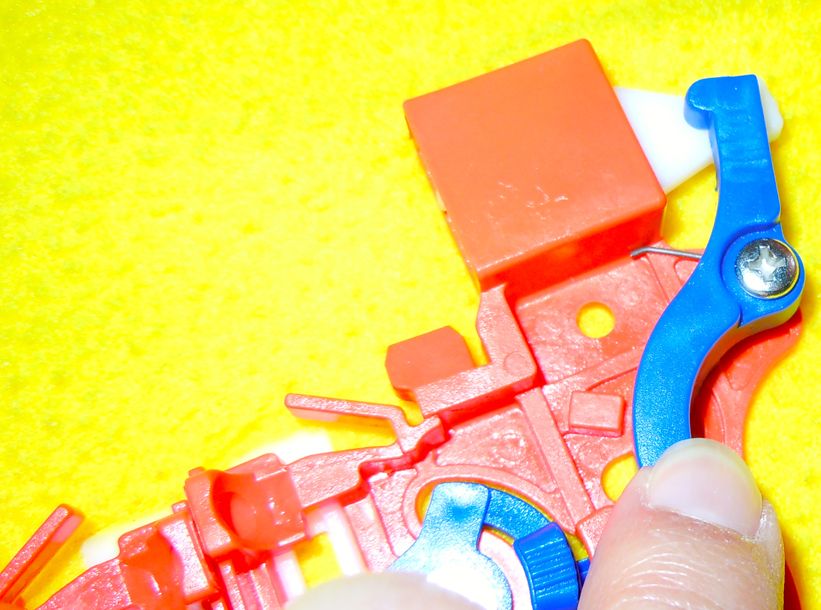
_________________________________________________________________________
STEP 15: ATTACH UNDERMOUNT RUNNERS TO DRAWER BOX (FOR ALL RTA DOVETAIL BOX MODELS)
Place the drawer box on an accessible, solid surface, with the bottom facing up. Next, slide one drawer glide runner into a full open position (see 1st photo). Set that runner on the appropriate side of the drawer box, making sure the wheel end of the glides sits at the FRONT of the cabinet drawer. The thick metal pin on the runner should drop into the pre-drilled hole on the box (2nd photo). The hook on the back portion of the glide should fit into the pre-drilled hole at the back of the drawer (3rd photo). Repeat steps to add the drawer glide to the other side of the box.
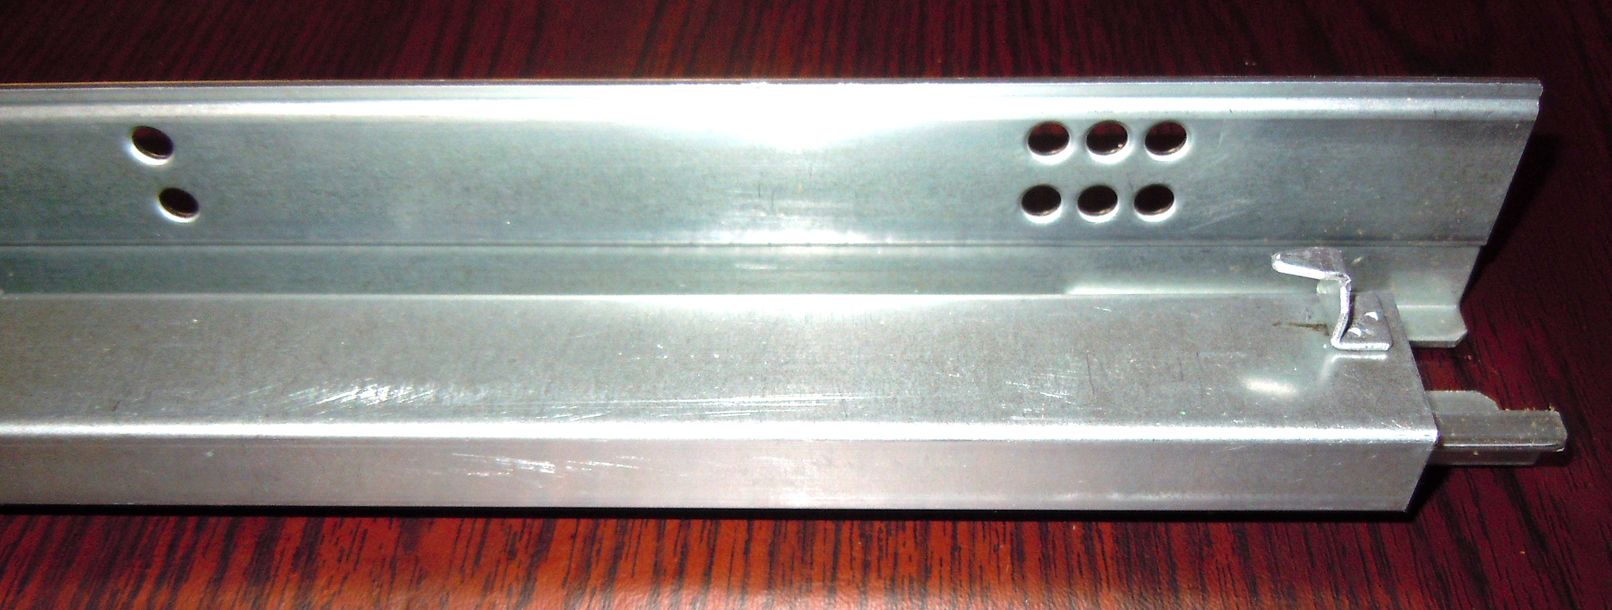
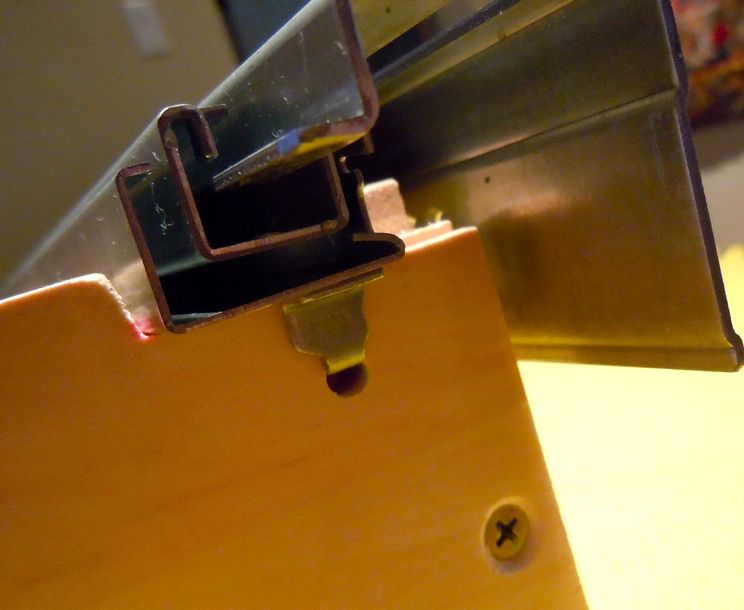
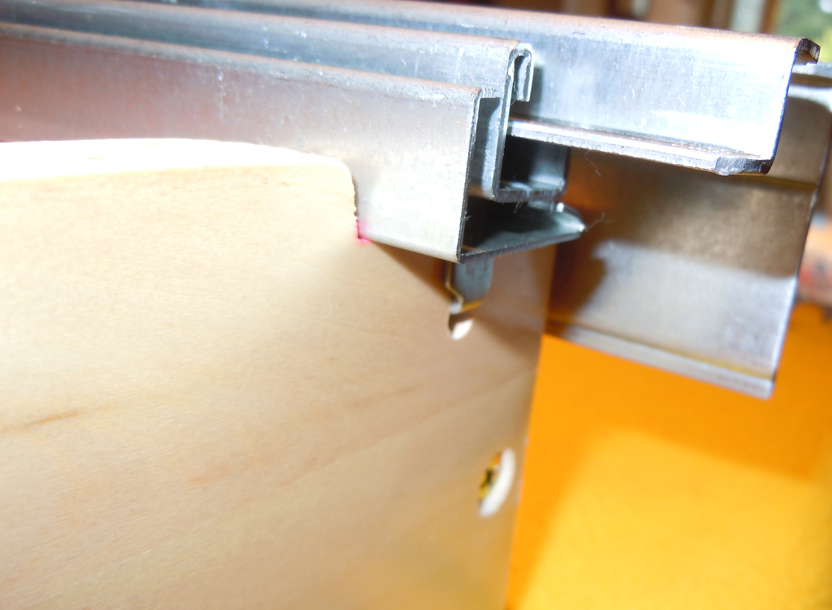
First photo shows LEFT side drawer glide. Turn it upside down, and fit the hook into the open hole on the back. (2nd & 3rd photos show a RIGHT side drawer glide).
___________________________________________________________________________________________________
STEP 16: ATTACH NYLON DRAWER GLIDE SUPPORTS TO BACK PANEL (These may be rectangular white pieces, or white nylon knob-shaped pieces)
Insert the 2 white nylon drawer guide support brackets into the holes at the top of the cabinets back panel. Make sure they are aligned, then screw into place.
(You may need to slide the nylon glide all the way to the right to have room to add the screw on the left, and then slide the glide all the way to the left to have room to add the screw to the right. Once the screws are in, center the nylon bracket.

________________________________________________________________________________________________________________________
STEP 17: INSTALL DRAWER AND ATTACH GLIDES TO DRAWER BACK
Carefully insert your drawer in the drawer opening at the top of your cabinet. Slide the metal glides onto the nylon drawer guide support brackets attached to the back of the cabinet. Do NOT shove the glide all the way to the back of the nylon pieces.


_________________________________
STEP 18: SCREW DRAWER GLIDE INTO PLACE
Make sure the drawer is evenly aligned. With the drawer in its full open position, attach one small FLAT-headed 4X10 screw from the drawer rail to the SIDE of the drawer opening at the FRONT of the drawer. (You have 3 of these flat-headed screws; 1 is extra). Attach one small FLAT-headed 4 X 10 screw from the drawer rail to the OTHER side of the drawer opening at the front of the drawer. Shim if necessary with cardboard or a small scrap of wood.


FOR ALL BBG, SEMI-CUSTOM, AND DELUXE CABINETS, SKIP TO STEP 21:
_______________________________________________________________________________________________
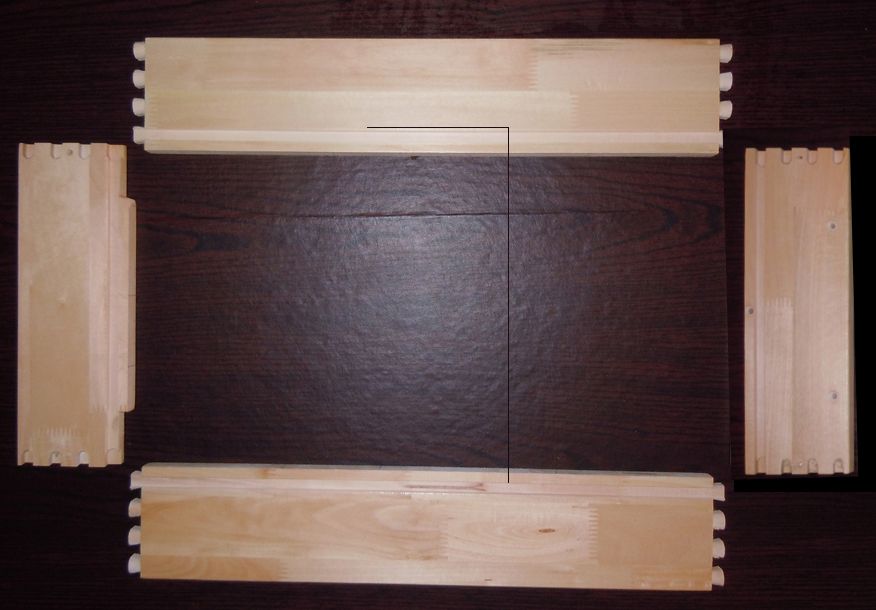
STEP 19: FOR COUNTRY OAK AND CABINETS ONLY:Use your longest screws when assembling the drawer box. Carefully align and attach one side panel of the drawer box to the back portion of the drawer box head. Attach the second side panel to the back of the drawer box head. Then attach the two drawer sides to the drawer back, again using the longest screws you have.
NOTE: The Country Oak RTA model featured below and our Santa Fe RTA model come with side mount glides. All of our other RTA models come with UNDERMOUNT glides.


Lay out the drawer parts Back of drawer parts - drawerhead on right Screw drawer sides to back of drawerhead


____________________________________________________________________________________________
STEP 20: FOR BUILDER GRADE CABINETS WITHOUT DOVETAIL DRAWERS: - ATTACH UNDERMOUNT RUNNERS TO DRAWER BOX
Place the drawer box on an accessible, solid surface, with the bottom facing up. Next, slide one drawer glide runner into a full open position (see 1st photo). Set that runner on the appropriate side of the drawer box, making sure the wheel end of the glides sits at the FRONT of the cabinet drawer (see 1st photo). The thick metal pin on the runner should drop into the pre-drilled hole on the box (2nd photo). The hook on the back portion of the glide should fit into the pre-drilled hole at the back of the drawer (3rd photo). Repeat steps to add the drawer glide to the other side of the box.


___________________________________________________________________________________________________
STEP 21: ATTACH PLASTIC BUMPERS
Next, add 4 of the 6 tiny soft clear plastic bumpers to the 4 holes on the inside of the drawer front. Add the other 2 bumpers to the 2 holes on the inside of the door face. These bumpers allow the drawer and door to close quietly.

__________________________________________________________________________
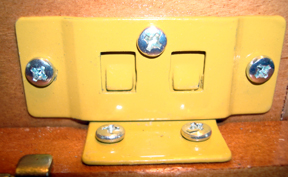
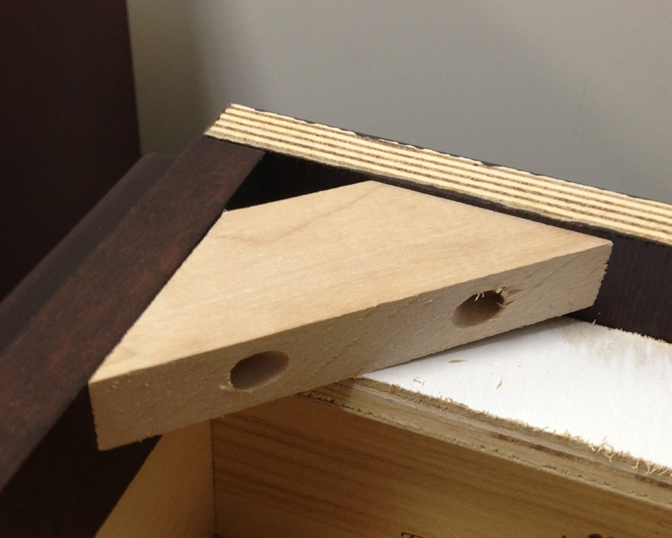
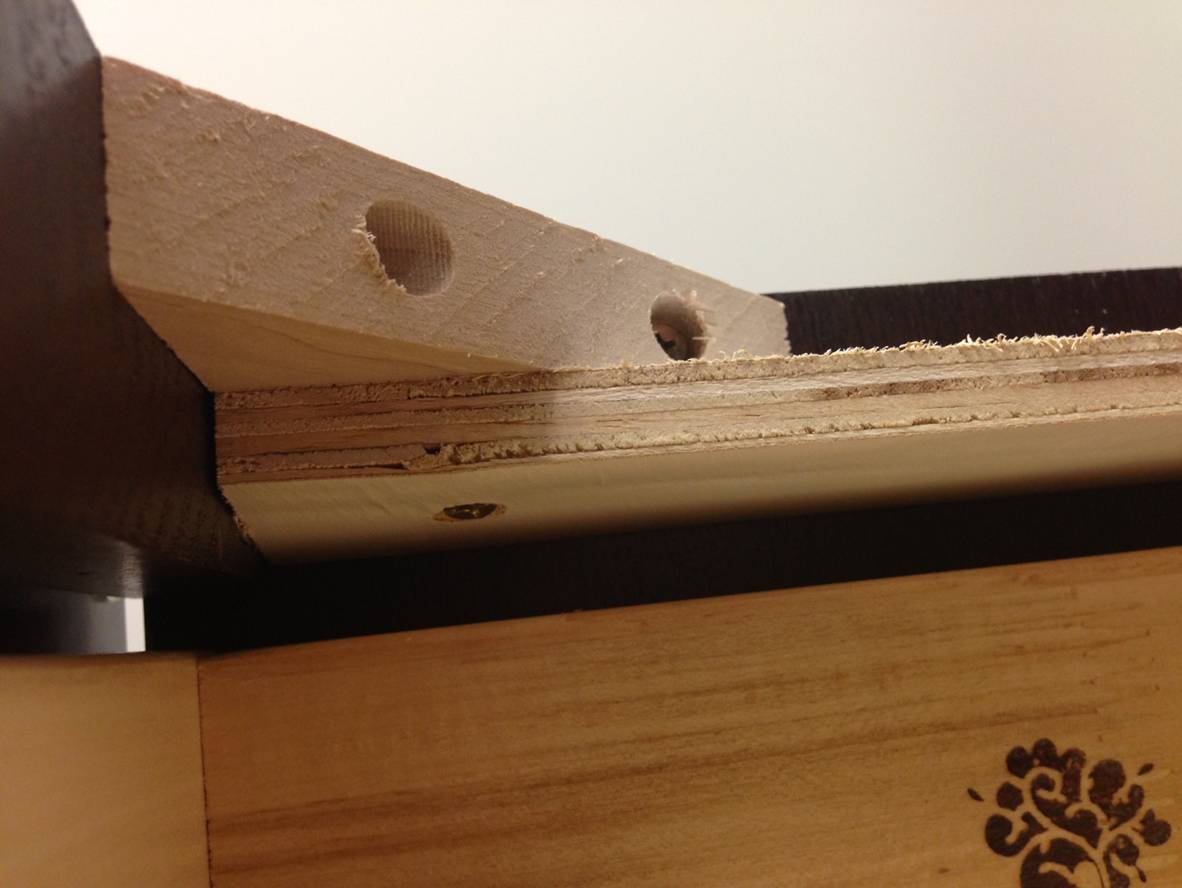
STEP 22: ADD WOOD CORNER BRACKETS TO DELLUXE OR SEMI-CUSTOM CABINETS, OR PLASTIC CORNER BRACKETS to BUILDER GRADE CABINETS
Plastic and wood corner brackets serve two purposes. First, they help make sure your cabinet is squared off, going into a wall. Secondly, they allow a laminate or similar countertop to be screwed into place over your cabinets. (Even if you intend to add a granite top, use these for additional counter support).
Plastic corner brackets come with builder grade cabinets; semi-custom and deluxe cabinets like this French Cream cabinet below come with wooden I-beams and wood corner brackets.
FOR SEMI-CUSTOM OR DELUXE CABINETS:
Place one wooden bracket in each corner, OVER the i-beam support. Attach with screws in holes.

SEE BELOW TO ADD PLASTIC SUPPORTS FOR BUILDER GRADE CABINETS:


Place one plastic corner support bracket on the corner of your cabinet top with the platic lip over the cabinet, and screw into place. Repeat on each of the other 3 sides. Your base cabinet assembly is complete, unless you want to drill holes in the drawer and cabinet door to add drawer pulls or handles.
*** All photos are COPYRIGHT PROTECTED and are the sole property of Kitchen Cabinet Discounts.
How Assemble RTA Cabinets - Kitchen Cabinet Discounts
DIRECTIONS FOR ASSEMBLING A WALL CABINET Wall cabinets are easier to assemble than base cabinets because they have no drawers, toe kicks, or corner brackets.
Buy Discount RTA Cabinets Ready To Assemble RTA Kitchen ...
ShopRTACabinets offers a huge online selection of ready to assemble RTA cabinets at discount prices every day! Find deals on cabinets up to 75% off. Nobody beats our
Order RTA Cabinets - KITCHEN CABINET DISCOUNTS - RTA ...
Our Ready to Assemble cabinets come thoroughly wrapped in cardboard To order Kitchen Cabinet Discounts' RTA cabinets or to order samples of our discount
RTA Kitchen Cabinets - Kitchen Styles - Kitchen Cabinet Depot
Ready to assemble (RTA) kitchen cabinets are available in a By purchasing a set of RTA kitchen cabinets from Americas favorite kitchen cabinet discount
Buy RTA Cabinets Cheap Wholesale Discount Ready to ...
of your rta kitchen cabinet needs offering discount discount kitchen cabinets to our RTA Cabinets or Ready to Assemble Kitchen Cabinets
RTA Kitchen Cabinets Online - Buy Ready to Assemble ...
Contractor Discount Program; ready to assemble (RTA) kitchen cabinets are the As one of the largest suppliers of kitchen cabinets online, Kitchen Cabinet
Kitchen Cabinet Discount: Implied or Realistic? - RTA ...
even kitchen cabinets increase the complexity of the kitchen cabinet discount. Everyday Discounts ready-to-assemble RTA kitchen cabinets and
Ready To Assemble Kitchen Cabinets - Kitchen Cabinet Depot
Purchase ready to assemble kitchen cabinets from the Kitchen Cabinet Depot. Discount Kitchen Cabinets Store Ready To Assemble (RTA) Kitchen Cabinets
RTA Kitchen Cabinets - Kitchen Cabinets - The RTA Store
Ready To Assemble Kitchen Cabinets. it is a total of 20 feet of wall space. 10x10 pricing is a common method used by kitchen cabinet retailers © 2014 The RTA
RTA Cabinets Coupons - RTA Cabinets Promo Codes - The RTA ...
Kitchen Cabinets. Ready To Assemble; Cabinet Knobs; Backsplashes; Kitchen Hoods; Inside Cabinet Accessories; Kitchen Islands and Carts; RTA Cabinets Coupons
Travelling is my life
ConversionConversion EmoticonEmoticon