
After painting our bathroom vanity last winter, I really thought hard about also painting my kitchen cabinets too, which had the exact same honey oak cabinets. I knew it would be a big project. When I did the first bathroom I sanded, primed, painted and put a finish coat on them. Heres a link to the post I did on painting honey oak cabinets. I really liked the outcome and had planned to use the same method , but then I ran across an article in Better Homes and Gardens about various techniques for painting kitchen cabinets and they mentioned a product from Rust-Oleum specifically made for cabinets that didnt require sanding. WHAT!? No sanding? I was skeptical but willing to give it a try, so I bought the kit last summer and did our upstairs bathroom vanity as a test run. I chose a similar espresso color as I had used for paint on my other bathroom. In the end, the Rust-Oleum Transformations Cabinet kit won out both for process and outcome for me, so thats what I decided to use for the kitchen.
I took the week before Labor Day off from work and started right in on the kitchen, knowing it was going to be a big job. We had some other updates planned for the kitchen, so we did the countertops over that first weekend.
I used the large Rust-Oleum Cabinet Transformations kit in Espresso, which I purchased from Lowes for about $150. The paint department mixes in the color you select. The kit contains much of what you need, but you will have to buy paint brushes and disposable paint containers, painters tape, drop cloths (if you need them), lint free cloths, and gloves if you dont want to get your hands too dirty.
The process is fairly straightforward. You can also read more detailed instructions on their website.
- Clean cabinets using the deglosser and scrub pads included in the kit. This is what replaces the sanding step.
- Prep cabinets by taping along walls, etc.
- Apply bond coat using a paint brush. This is the color. You use 2 coats. I did all of the cabinet frames first and then did the doors fronts and backs.
- Apply Decorative Glaze (optional) you wipe this on with cheesecloth I did not end up doing the glaze. More on that later.
- Apply Protective Top Coat They say you only need one coat, but I did two, and Im glad I did.
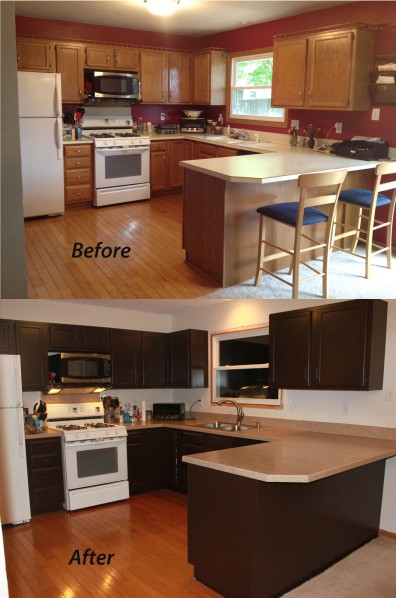
Here are some before, during and after pictures.
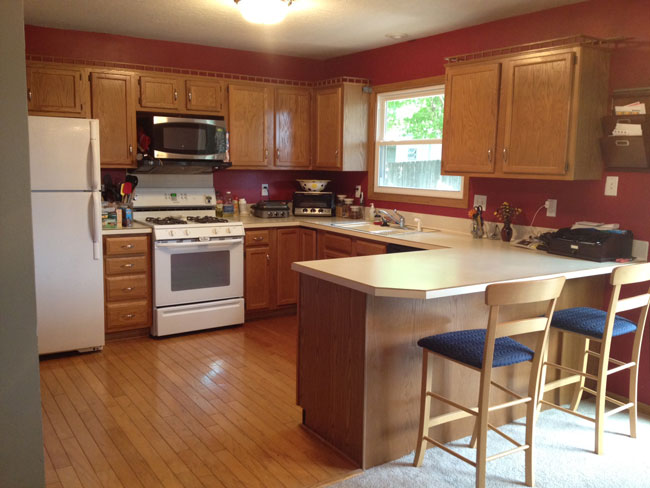
Before: dated honey oak cabinets
Deglossing, cleaning and prep for painting base coat.

During: Cabinet frames completed.

After: Cabinets finished, hardware installed, walls painted.

Overall I was extremely pleased with the final product. Were not done with our kitchen yet, but were getting closer, so dont mind the missing trim on the window and such. Ill do another post on the real after for the whole project once we get a few other things completed.
Pros, Cons and Tips:
- Read the directions several times and watch the video included in the kit or on the website.
- This was a time consuming project. My husband hates painting, so I knew Id be doing this one on my own. It took me a full week working mostly 9-5 each day, sometimes longer, just to get the cabinet frame completely done and about 1/3 of the doors. The rest of the doors took me several weeks to complete because I was mostly doing them after work and only 1-2 nights a week. My recommendation would be to have 2 people working on this if possible and have one working on the frame and the other on the doors at the same time. The doors take longer because you have to do fronts and backs with both the color and the top coat x2 coats of each.
- The deglossing, cleaning and prepping took me a full day to do. I preferred this to sanding which would have probably taken about the same amount of time.
- The base coat has a consistency in between stain and paint in terms of the thickness of it. It covered well, and I believe it chips less because of this.
- I tried using a roller hoping to make the project go a little faster, but because its much thinner than typical paint, it left bubbles when using a roller which I then had to use a brush on, so you really do need to use a brush. I had no problems with visible brush strokes in the base coat, it really goes on nicely.
- I chose not to do the decorative glaze option. I agreed with some of the reviews I had read which indicated that with the darker color kit, it was difficult to really see any difference with and without the glaze. I tried it on a spare board to see for myself though. If youre using a lighter color, it would be more visible.
- You will see some of the grain if your wood is grainy, like an oak. This was also true when I painted the bathroom cabinets using actual paint, so dont assume this will act as a filler it wont.
- The protective top coat was the only part that I found difficult to work with and preferred the top coat I used for the more traditional method. The top coat that comes with the Rust-Oleum kit is a milky color and you have to be pretty precise with it. You must apply as very thin coats and make sure you have no visible white in cracks and crevices. Think of Elmers glue and how it dries white if its not perfectly thin very similar to what happens here. You also cant rebrush where youve already brushed and it starts to dry very quickly. The outcome if you apply correctly is very nice, but its a little more frustrating to work with than any other part of the kit. Even though youre using a brush to apply it, if you do it well, you wont really see brush strokes in the finished product.
- I did two coats of the protective top coat and Im glad I did. i feel like the finish looks a lot more polished than it did with just one coat, and it will wear better long term.
- The directions recommend that you do the backs of the doors first. I found it worked better to do the fronts. If I was going to have any build up or potentially run off of paint or top coat, I wanted it to be on the backs of the doors.
- The product doesnt have a typical paint or stain smell. I found it very easy to work with for a long time without getting a headache. It was very low odor which was a nice bonus.
- My cabinets are showing virtually no wear and tear at this point. Its been about 4 months since we completed the cabinets.
- It is possible to fix scratches. When my husband took our existing floor out, he accidentally scratched the side of the island. I almost cried after all the time spent painting the cabinets, but it actually repaired just fine and is visible only to me who knows its there.
All-in-all, I would definitely recommend the Rust-Oleum Cabinet Transformation product. In fact, I already have two other friends who have used it on their kitchens.
I cant wait to get the kitchen fully done. It feels like its been so long. So far weve done the countertops, painted the cabinets, replaced all the hardware and light fixtures, replaced the flooring (not shown) and painted the walls. Next up: replace trim on windows, add crown molding, make/get curtains, and decorate walls. Were in the home stretch!
Tagged: Cabinets, home improvement, kitchen, painting cabinets, painting kitchen cabinets, Rust-Oleum, Rust-oleum Cabinet Transformation
Painting Kitchen Cabinets - Sometimes Homemade
Instructions for painting kitchen cabinets from honey oak to a dark espresso. Lots of before and after photos and tips for a perfect final finish. Rustoleum Cabinet
Painting Kitchen Cabinets - Sometimes Homemade
Enter your email address to subscribe to Sometimes-Homemade and receive notifications of new posts by email. Email Address
Painting Kitchen Cabinets Sometimes Homemade - Pics Of ...
Image Info : Image Title : Painting Kitchen Cabinets Sometimes Homemade. Dimensions : 920 x 380 Pixel. Large : 1024 x 768 Pixel. Original : 1632 x 1224 Pixel
Painting Kitchen Cabinets Sometimes Homemade how to paint ...
Painting Kitchen Cabinets Sometimes Homemade, kitchen cabinets painted is an our picture under Kitchen Designs category that formated as image/jpeg. with some
Painting Kitchen Cabinets Sometimes Homemade | demenglog.com
Related Painting Kitchen Cabinets Sometimes Homemade. Coloring. July 11, 2014. White Small Living Room Design Ideas Home And Home Design
Painting Kitchen Cabinets Sometimes Homemade Ms3X9EC1 ...
Painting Kitchen Cabinets Sometimes Homemade Recent Posts. Small Black Wooden Kitchen And Bar Pictures Photos Images He7tJ5ZK
Painting Kitchen Cabinets Sometimes Homemade | Flixpod.Com ...
Painting Kitchen Cabinets Sometimes Homemade uploaded by flix at 17 May 2014, the extraordinary painting kitchen cabinets sometimes homemade image above is one of few
Painting Kitchen Cabinets | Sometimes Homemade
Instructions for painting kitchen cabinets from honey oak to a dark espresso. Lots of before and after photos and tips for a perfect final finish.
Painting Kitchen Cabinets - Pinterest
Instructions for painting kitchen cabinets from honey oak to a dark espresso. Sometimes Homemade Instructions for painting kitchen
Painting Kitchen Cabinets Sometimes Homemade painted ...
Extreme kitchen cabinet frames painted is not a constraint to build a magnificent Popular Kitchen. At least you can see from the newest ideas of Painting Kitchen
Travelling is my life
1 comments:
Click here for commentsThank you for providing such a valuable information and thanks for sharing this matter.
kitchen cabinet painting Toronto
ConversionConversion EmoticonEmoticon